|
Gear wheel calculator
|   |
Gear wheel module
Field of application
The gear wheel module allows to overlay the live image with
the outlines of a freely definable gear wheel.
Currently only the involute tooth shape can be displayed.
The next stage of development will include the tooth shape
cycloid e.g. for gear wheels of clocks.
So, two different application areas can be defined:
1.
By adapting the gear wheel parameters, the outline of the
gear wheelcan be approximated. As soon as the outline
matches the live image,the parameters can be read out.
2.
The nominal parameters are adjusted in the program window,
then the outline overlays the live image. That way irregularities
from the nominal condition can be discovered quickly.
A faded in gear wheel can be easily adjustet by the means of
the hair cross single rotatable. In the process the arrow keys
and the keys " + "and " - " work as described at the keyboard
Handling of the module
At the end of the toolbar stands this button ![]() representing a
representing a
stylised gear wheel. By pushing it, a new window is opened
where the gear wheel can be defined.
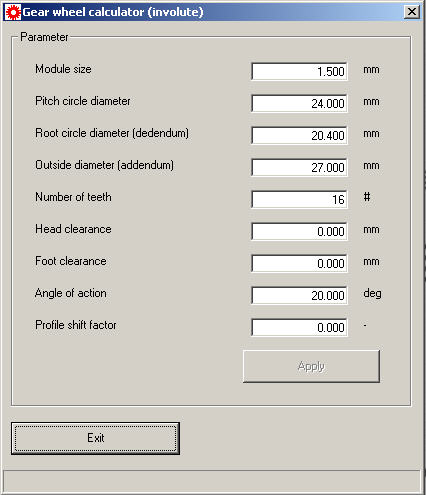
The following image shows the parameter window of the gear
wheel module.

The basic dimensions of a gear wheel are:
- Module size
- Number of teeth
From this, a standardized gear wheel can be completely
calculated.The size of the module of millered gear wheels is
due to the applied tool,thus the module size of the mill.
The number of teeth is obviously offered by counting.
Reference note: With a large number of teeth it is recomended
to use the measurement program function "count", since each already
counted tooth is marked.
Having entered a new module size and pushed the button "Apply",
the dimensions "Pitch circle diameter", "Root circle diameter" and
"Outside diameter" will be newly calculated. 
The method is similar, when the number of teeth is modified.
With unknown gear wheels, it may happen, that the size of the
module deviates from the standard. In that case the outside or root
circle diameter can be determined using the functions "diameter" or
"(multi point-) circle". Hence results a first clue for the module.
Thus the module is newly calculated when entering the outside-,
pitch- or root circle diameter.
The dimensions "Module size","Outside diameter", "Pitch circle
diameter","Root circle diameter" and "Number of teeth" are associated
with each other, so they can not be determined undependently of
each other. By pushing "Apply" the at a time dependend parameters
are newly calculated.
The parameters "Head clearance" and "Foot clearance" affect directly
on outside- and root circle diameter. There consists no effect on the
other parameters. The meaning ot these parameters immediatly
results from their names: with standarized gear wheels running, the
tooth tip would touch the tooth root. To give this running more
clearance, the tooth can be shortened at the tip or milled out deeper.
Accordingly the head and foot clearance rise.
The parameters "Angle of action" and "Profile shift factor" change the
tooth shape.The profile shift factor is the easiest to understand. It means
that the module milling cutter of the machine is feeded more or less.
Correspondingly the teeth are milled more or less deep into the gear
wheel.
For the pressure angle imagine the mode of operation of a gear pair.
Connect both centres of the gear wheels with an imaginary line. At the
first contact the teeth touch each other at a certain point. While running
this contact point slips on a line until both teeth loose the contact again.
This line is called "Line of action". The angle which this line takes over
towards the vertical reference line is named "Angle of action". Via the
angle of action the transverse contact ratio, and thus wear and running
smoothness of the gear, are determined.
The parameters "Angle of action" and "Profile shift factor" do not have an
affect on the other parameters, and are independent from them. They only
change the shape of the teeth.
Example for the adaption of the parameters to a present gear wheel
The calibration of the lens is a basic requirement.With the function "Count"
the number of teeth is determined. This number can be entered directly
into the parameter window. After each activity the "Apply" button must be
pushed.
With the function "Diameter" or "Diameter LSC" the root circle diameter
and th eoutside diameter can be determined. Since these dimensions are
dependent from each other, it makes no sense to enter them one after the
other into the parameter window. In fact, an indication for the module size
results from these measurements
The profile shift factor initially should remain at 0.
Typically the pressure angle is 20°, at automobile technology often 17,5°
and with special gear wheels "high gearing" it can be reduced until 5°.
Enlarged angles of action lead to narrow head and an extended foot.
Smaller angles of action lead to an extended head.
After the size of the module has been approximately determined by the
outside diameter and/or the root circle diameter, the size of the module
will now be adjusted directly, so that the shape of the teeth is optimal
approximated .
If, by this adaption the outside- and/or the root circle diameter are
aligned worse, alter the head- respectively the foot clearance.
If this leads to the teeth beeing all in all to narrow or to expanded,
the profile shift factor must be modified.
If the head of teeth is to expanded and the foot is to narrow, the angle
of action must be changed.