|
Setting up a camera
|   |
|
Setting up a camera
| |
Notes on setting up a camera from the USB 2 uEye series:
1. Set up options
2. Sequence when setting up image
1. Set up options:
After the measurement program has been started and the video display selected either by
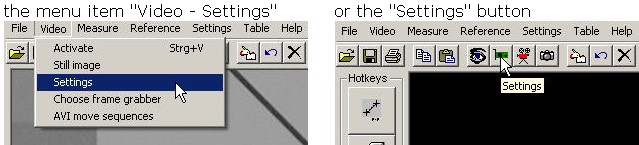
you will be able to access the following camera settings:
Image 3 - brightness and contrast
which you can use to set up the display of the image.
Please note that the settings depend on the parameters in the second tab
( image 4 ) (see below).
Image 3: Values after clicking on "Standard value"
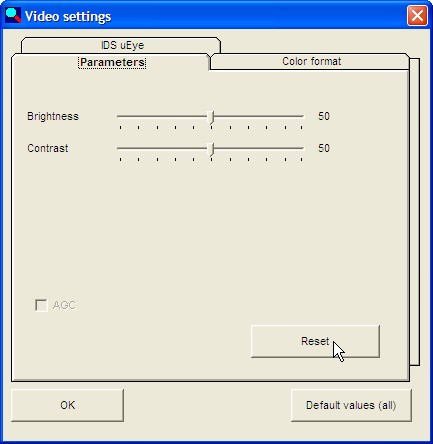
Image 4: Values after clicking on "Standard value"
The standard values depend on the type of camera and can vary.
In this example the uEye 1540 C camera was used.
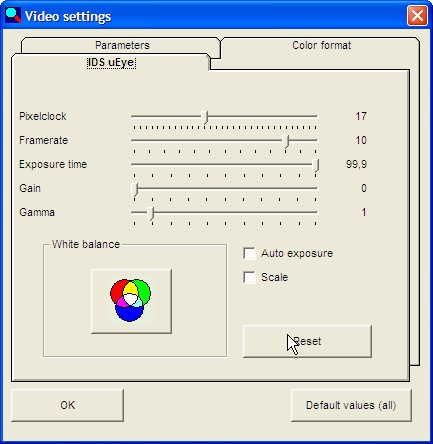
The ranges of adjustment for pixel frequency and frame rate
depend on the type of camera.The frame rate ( images per second )
is directly dependent on the pixel frequency, the read-out speed of the
sensor. The pixel frequency also affects the image brightness - the higher
the pixel frequency the darker the image.The higher you set the pixel
frequency then the higher can be the frame rate.
Further, the frame rate affects the image brightness and contrast.
The brightness decreases with increasing frame rate.
You can use the "Gain" slider to increase the basic gain, should brightness
and contrast alone not be sufficient. The noise in the image will be greater
at higher levels of gain.
You can use the "white balance" to adapt the colour image display to your lighting.
2. Sequence for the image settings
With USB cameras you can make the following settings:
On the tab: IDS uEye:
Pixel Frequency :
read-out speed of the camera chip
Frame Rate :
number of images per second
Exposure Time:
corresponds to a "mechanical aperture"
Gain:
for colour cameras, a slider for enhancing the colours allowing
for the values of the white balance
Gamma = correction slider, which corrects for the imbalance with the
image display due to different hardware.
Additional: white balance and scaling (not available for all camera versions)
On the tab: Parameters:
Brightness
Contrast
Aim: to show an image with a good contrast at the highest
possible image refresh rate (frame rate).
In principle the pixel frequency and the frame rate are set up to the right stop.
The maximum pixel frequency depends on the type of camera and the
performance of the computer.If the image stops being updated the pixel frequency
is reduced towards the left in steps until the image again becomes "live".
The reduction of the pixel frequency leads to an automatic reduction in the
frame rate (which is appropriate).
.
Brightness, Contrast and Gamma can be set using the button for standard values.
If the image is too bright then first reduce the image to the display as desired using
the slider for exposure time.Only then should adjustments be made using the
brightness and contrast sliders.
For images that appear too dark set the exposure time to the maximum and then
adjust using the sliders for brightness and contrast. If this is not sufficient then you
can increase the gain. Too high a gain leads to noise in the image.
If even this is not enough then the image brightness can be increased by reducing
the pixel frequency and thus also the frame rate.
The gamma slider should only be used where absolutely necessary since gamma
"distorts" the relationship between brightness and contrast. Test to see how the
image changes.Therefore: only use gamma as a last result.
The point where a particular adjustment has reached its limit and the next option for
adjustment has to be used can only be tested directly on the object.