|
File
|   |
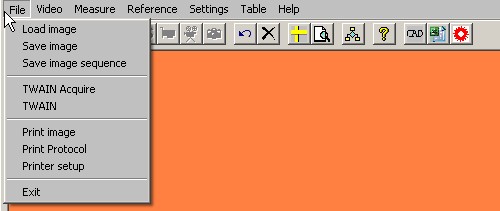
The menu item "File" contains the sub-menu items:
Please click in the image on that function
you want to learn more about.

This command loads files (=images) into the METRIC measurement window.
All standard file formats can be opened, e.g. bmp, tif, jpg, etc.
This command can also be found in the toolbar.
Note: During the program is running the last working directory used is set as
the default. This applies to all commands, which read from or write to the hard
disk, with the exception of program settings, which are all found in the working
directory.
This command allows you to save the image shown in the working area. The
images can be saved as desired in either of the formats
(bmp, wmf, tif, pcx, jpg, png or gif) in the selected directory on the hard disk.
The preferred image format, which can be set using the program options,
is prompted when saving, but the selection can be altered in the common
dialogue box.
The image is always saved together with all drawn graphic elements. If the image
is to be saved to the hard disk without these elements then they must first all be
deactivated - this includes the hair cross and the scale
(from the "Reference object" menu). Also the table must be deleted.
This command can also be found in the toolbar.
Note: During the program is running the last used working directory used is
set as the default. This applies to all commands, which read from or write to
the hard disk, with the exception of program settings, which are all found in
the working directory
Save image sequence

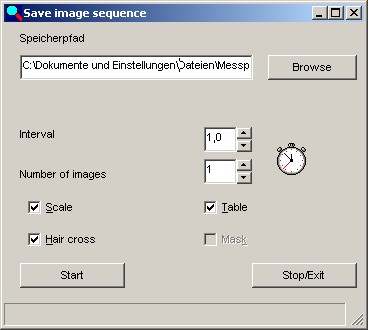
This command allows you to save images at fixed time intervals. This command
is only appropriate (and can only be used) in live image mode. The above image
shows the input screen for using this special function.
The text field shows the name of the first file. The program attempts to recognise
automatically the part of the name, which contains the sequential image number.
It then automatically increases this during the recording of the image sequence.
The "Search" button opens a to a file selection window.
Time interval can be used to set the pause length between the recordings of images.
CAUTION: depending on system utilization it may be that Windows does not save
a new image immediately at the end of the time interval.
Number Of Images is used to enter the desired number of images within the sequence.
The check boxes Scale, Hair cross, Table and Mask can be used to select
whether the images to be saved should include these measurement elements.
The Start button starts the recording of images.
The Exit button exits this screen.
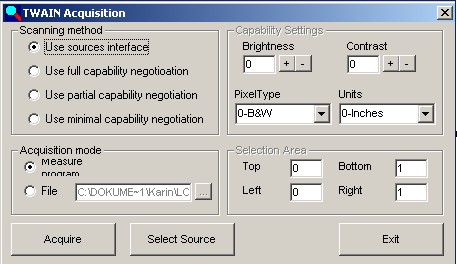
This command allows you to read in image files from TWAIN sources. Every
Windows™ supported TWAIN source can be used as a source of images for
the measurement program. For example a PCMCIA grabber can be set up on
laptops in order to work almost "live" or the FG 33 used to measure within
the live image.The selection screen for the TWAIN source administration is opened.

If there is no need to select and set the parameters for the source then this
menu item can be used to call up the source interface directly.
This command allows you to print the image displayed in the working area
without any text or other information on diameters and was specially designed
for printing to video printers. The printout can also be made on any standard
Windows printer.
This command can also be accessed from the toolbar.
Note: for technical reasons the image areas shown on the monitor and on the
printout may be different. If the size of the METRIC window is so small that the
whole of the image is not shown then the printer will still print out the whole image.
This means that it may happen that a hair cross, which on the screen appears in
centre of the image detail may appear on the printout above the centre of the image.
Print report
This option not only prints out the image but also the available measurement data as
text; it is intended for printing out on normal paper.